Moving data into cloud storage can present a number of challenges for organizations across all industries. Some of these challenges include finding a tool that can simplify the process and a solution that can move the data to the cloud as fast as possible. This blog will examine two methods used to transfer files into Microsoft Azure Blob storage: using Microsoft’s tool AzCopy and using FileCatalyst Direct.
Learning How to Transfer Files into Microsoft Azure Blob Storage
For the tests, we used multiple moderately priced VMs inside Azure. We also chose regions that are geographically dispersed to create latency between the source machine and the storage location. Here is how we set it up:
The client/source machine was hosted in the West Europe region. The machine was a standard D4s v3 (4 vcpus, 16GB memory each) running Windows Server 2016 Datacenter.
See the full specifications in the image below:

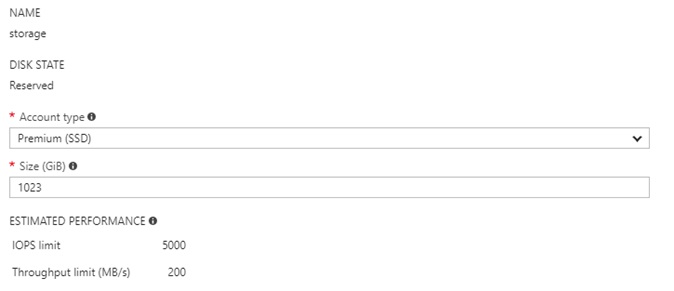
Because it was acting as the sending/uploading machine, to be sure the read speed was good enough for multi-Gbps speeds, we defined a high-speed storage and attached it to the VM:
We then configured an Azure Blob Storage container in the West US region:

We disabled the “Secure Transfer Required” feature for the Blob storage since using HTTPS consumes a lot more CPU power. Obviously, this isn’t recommended if you require secure transfers. Just know that the sending machines will use a lot more of your CPU’s resources if you use HTTPS. Finally, we created a container called “testcontainer” that will receive the files.
To transfer files using FileCatalyst Direct, we required a VM that was hosted in the same region as the Blob storage container. So, we created a VM with twice the cores as the sending machine since it will be doing twice the work. The VM has to receive the FileCatalyst accelerated UDP stream and then send that data out to the Blob storage at the same rate. We used a Standard DS4 v2 (8 vCPUs, 28 GB memory), full specs below:

Since FileCatalyst Direct writes data directly to the Blob storage, we didn’t need to define any fast storage for the West US VM. The file data is streamed directly into the blob storage.
Note that for all of the involved VMs, we had to enable Accelerated Networking to get speeds higher than 1 Gbps.
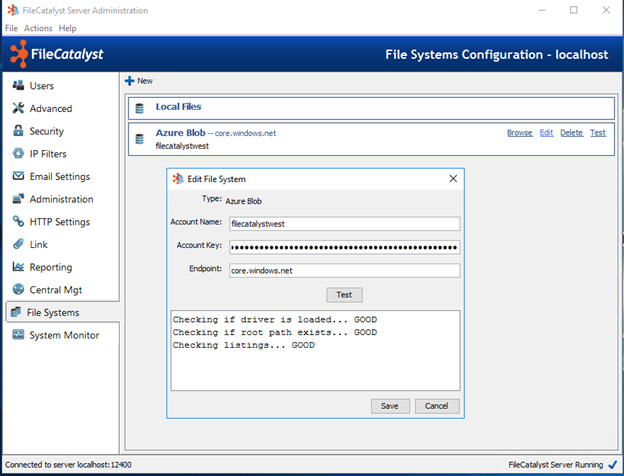
Adding your Azure Blob storage account to a FileCatalyst server is an easy process; just go to the File Systems tab, and click New, select “Azure Blob” and enter your Account name, Account key, and the Endpoint. See below:
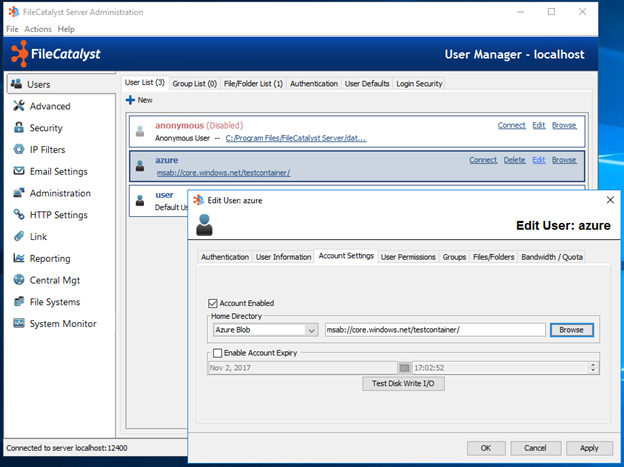
Now that we have added Azure Blob storage account to a FileCatalyst server, we can define a user account that points to your container. See below:
To upload the files, FileCatalyst HotFolder was installed on the West Europe machine. At this point, we were ready to test and compare AzCopy to FileCatalyst Direct.
Tests to Run
Transfer a single 5GB file from local storage in West Europe to remote Azure Blob container in West US
- Transfer ten 500MB files from local storage in West Europe to remote Azure Blob container in West US
- Transfer a thousand 500KB files from local storage in West Europe to remote Azure Blob container in West US
All the tests, for both FileCatalyst and AzCopy, were run ten times. The results were averaged and compared.
AzCopy
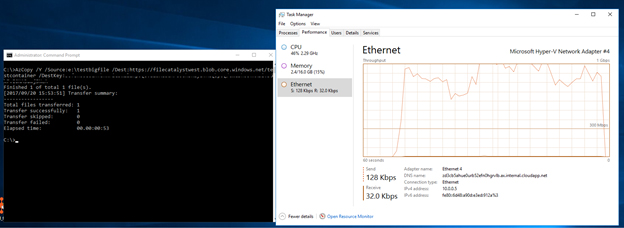
Here is a screenshot of AzCopy uploading a single 5GB file from West Europe to Blob storage in West US. You can see that the transfer topped out at under 1 Gbps.
FileCatalyst HotFolder
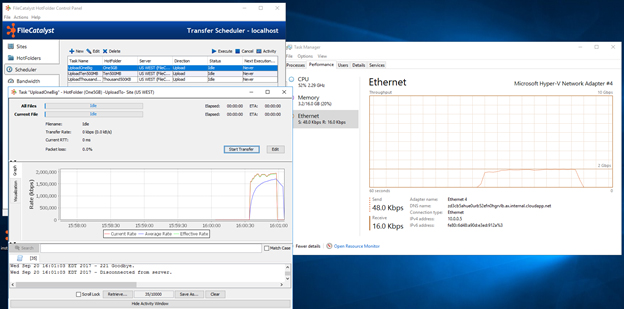
Here is a screenshot of FileCatalyst HotFolder uploading the same file from West Europe to Blob storage in West US. You can see that FileCatalyst Hotfolder sustained 2 Gbps during the test.
Test Results
Here is a complete breakdown of the test results:

AzCopy excels in startup time for these tests. However, the peak rate for FileCatalyst Hotfolder is almost doubled. In most cases, FileCatalyst Hotfolder also has a much lower CPU usage.
FileCatalyst may provide the following benefits for data migrations into Azure:
- Faster transfer speeds for large files (>500MB) when the bandwidth exceeds 1.5 Gbps with > 80ms RTT or 1.0 Gbps with > 150ms RTT
- Less CPU intensive on client machine – easier to scale to higher speeds
- FileCatalyst uses a Single UDP stream per file instead of multiple TCP streams = friendlier to other traffic
- Application level features including automation and a web uploader
- Can be scaled beyond 2 Gbps when the infrastructure allows. It isn’t limited by RTT doesn’t require more streams to scale.
- Very tolerant to packet loss (Wi-Fi and mobile networks) and jitter (bonded and multipath links)
Obviously, we chose to use Windows for our tests (after all, it is Windows Azure). These tests could easily be re-run using Linux since both AzCopy and FileCatalyst Direct both run on Linux.
How Can You Get These Results?
To get these results when transferring files from your own infrastructure into Azure Blob storage using AzCopy, you don’t need to use any tools or VMs other than AzCopy.
If you want achieve faster speeds using FileCatalyst, you should start up a VM within the same region as your Azure Blob storage container. If you require speeds above 3 Gbps, you should choose an F16 instance. You can scale down the size accordingly if you don’t require that much speed.
You will need to get a FileCatalyst license (request a free trial here) and install FileCatalyst Server on your VM running in the same region as your Blob storage. Once FileCatalyst Server is installed, you can install FileCatalyst clients in your infrastructure (we used HotFolder in our tests).
And that’s pretty much it! Just follow the Getting Started Guide that came with your FileCatalyst software, and you will be transferring to Azure Blob storage in no time!
Further Results
A few weeks after we compiled all these results, we were able to get speeds of up to 3 Gbps with FileCatalyst by increasing the instance sizes to F16. We also verified that our driver for Azure Blob can actually write from an instance in the same region as the storage (at about 7 Gbps) when transferring 5 files at a time. When bandwidth is available, there is no reason that FileCatalyst would be limited by anything other than by CPU bottlenecks. We suspect as you get closer to 6-7 Gbps, you will need to use Jumbo frames to go any faster. But the determining factor on the bandwidth when running VMs in Azure is the instance size. See the links below about expected bandwidth for each instance size.
References
We found it hard to find all the educational documents we used to get the best speeds in the Azure infrastructure, so here are a few of the links we used to get started:
- Instance sizes and expected bandwidth for each
- Optimizing the bandwidth on your instances
- Testing the speed between your instances, or between your local infrastructure and a Azure VM
- How to enable Accelerated Networking on an Azure instance
Looking For a Way to Transfer Files Fast?
FileCatalyst Direct can help organizations overcome their large file transfer challenges and lead to efficient and effective workflows.