Using scripts to automate repetitive tasks is a common practice in most organizations. Each operating system supports its own scripting language, such as bash, shell, VBScript, and Windows PowerShell. As more business operations are wrapped in scripts, the management of these processes becomes a major obstacle. Organizations need to hire employees with specialized skills sets to write and manage scripts. When those employees move on to another company, the business is left with a knowledge gap of how the scripts were written and what business functions relied on them.
Scripts tend to have other weaknesses as well. Only carefully written scripts can notify administrators if the script encounters a problem. If data transmission errors occur while a script is copying or moving data, the script cannot recover or resume from those failures. When a script fails, the errors are typically written to the operating system's exception handler, which is usually cryptic and hard to understand.
What's more, once a script is part of a complicated business process and relies on several resources, such as a database, email server, or FTP server, the connection properties to these servers are usually stored in the script as plain text. If one of the resources needs to go offline for maintenance, an administrator has to manually stop the execution of the script until all the resources become available again. This can create bottlenecks when functions resume.
In this tutorial, you will learn how to convert an SFTP shell script into a secure managed file transfer project in GoAnywhere MFT.
Example Shell Script and Cron Job
In the example below, an administrator is creating SSH keys, calling a shell script to connect to an SFTP server to download a file, and then setting up a cron job to execute the script. The cron job is scheduled to run every day at 8:00 am. The shell script is missing important features like email alerts, auto resume if the copy fails, and relies on the presence of the key.
Step 1. Creating the SSH keys. Keys will be stored in the /home/USERID/.ssh/ directory
$ ssh-keygen -t rsa
Step 2. Copy the keys to the remote server.
$ cat id_rsa.pub >> authorized_keys
Step 3. The Shell Script.
#Directory of files trying to get: /home/USERID/files/target.txt
#Local server: /home/USERID/receive
#Shell script named /home/USERID/sftp-script/get_file:

lcd /home/USERID/receive
cd files
get target.txt
bye
Step 4. Scheduling the cron job. The cron job is scheduled to run every day at 8:00am.
$ crontab -e 0 8 * * * sftp -b /home/USERID/sftp-script/get_file localhost
In the examples below, you will learn how to perform the same processes in GoAnywhere MFT.
Managing Your SSH Keys
Just like the script above, you'll want to create or upload an SSH key in GoAnywhere MFT before you connect to your SSH server. GoAnywhere MFT provides key vaults for creating or managing your SSL, SSH, and Open PGP Keys. Rather than pull your key from a desktop location, you can add it to the key vault and then reference the key in your Resource.
To create or upload an SSH key, log in to GoAnywhere MFT. Click Encryption from the main menu, and then Key Management System. From here you can add a Key Vault or open an existing one.

Once inside the SSH Key Vault, you can create a new key, or import an existing one.

Creating a Reusable Resource
The next step in converting this script into a workflow is to create the reusable SFTP resource. Once the connection properties are created by an authorized administrator, they can be used again and again in Projects without needing to share or expose any credentials.
To create an SFTP resource, click on Resources from the main menu. On the Resources page, click the SSH Servers (SFTP/SCP/SSH) link from the left-hand pane. In the right hand pane, click the Add SSH Server button.
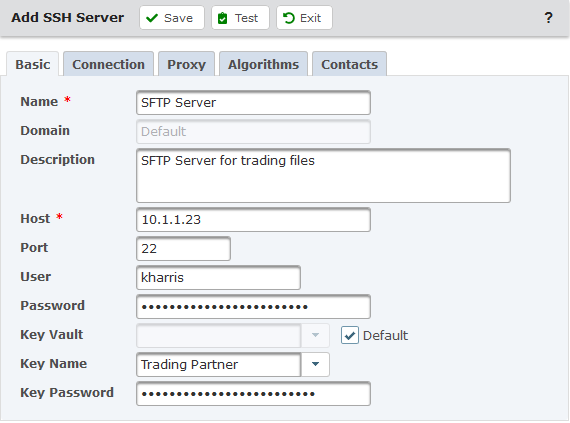
On the Add SSH Server page, enter your SFTP server credentials and connection settings. Select the appropriate Key Vault and the SSH Key that you created or added in the previous step. Before saving your resource, you can click the test button to ensure your resource has been configured correctly.
Creating a Project
Now that the Resource has been created, you can create a Project that will connect to the SFTP server and download the desired files. From the main menu, select Workflows and then Projects. Click the Create Project button. Give your Project a name and description, and then click the Save button.
From the Component Library, expand the FTP folder and drag the SFTP task up to the Project Outline. The Project Outline is intelligent and will highlight an area where a component can be placed. Hover over the Main module, and then release the SFTP component when the Main module turns green.
The SFTP task appears in the Work Panel. On the SFTP Server field, click the drop down arrow and select the SFTP resource you already created.

Next, you need to specify the action you want the SFTP task to take. In GoAnywhere MFT, this is accomplished by adding elements to the workflow. On the SFTP task, click the Add drop down option and then choose Get Files.
On the Get Files element, specify the Source File you want to download. You can enter the file path in the field provided, or click the ellipsis button to navigate the SFTP resource and select the file.
Next, specify the Destination Directory where GoAnywhere MFT will save the file.
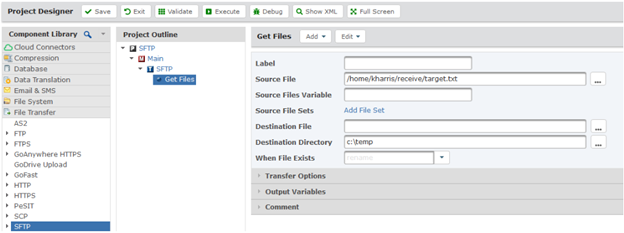
Click the Execute button to save and test your Project. The results of the Project will appear in the Work Panel, and a link to the Job Log appears.

Automating the Project
Now that the Project has been created and tested, you will want to automate the Project by creating a Schedule.
GoAnywhere MFT includes a built-in scheduler for executing Projects (workflows) at future dates and times. Projects can be scheduled to run "one time" or can be scheduled on a variety of recurring frequencies including every minute, every hour, every day, certain days of the week, and every month.
From the main menu, select Workflows and then click Scheduler. Click the Add Schedule button.
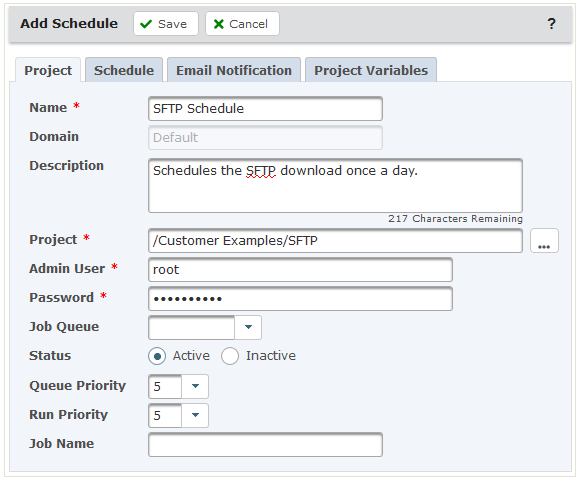
Provide the Schedule a name and optional description. Next, choose the Project that will run, and then add the login credentials of the Admin User that will be used to execute this Job.
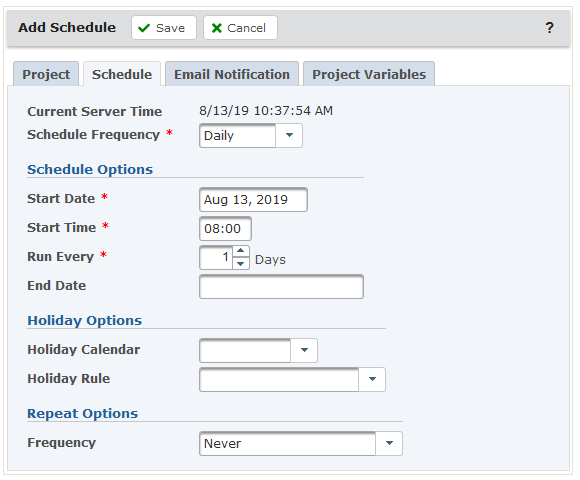
Click on the Schedule tab, and then select the frequency that the job will run, the day and time the Schedule will start, and the interval the job will run.
Click on the Email Notification tab. This tab is used to alert administrators when scheduled jobs complete successfully or if the scheduled job fails. Optionally, you can be mailed the job log for these events.
Once your Schedule is configured, click the Save button. You will be returned to the Schedule Manager, and your project will automatically run at the designated date and time.
Auditing Your Automated Project
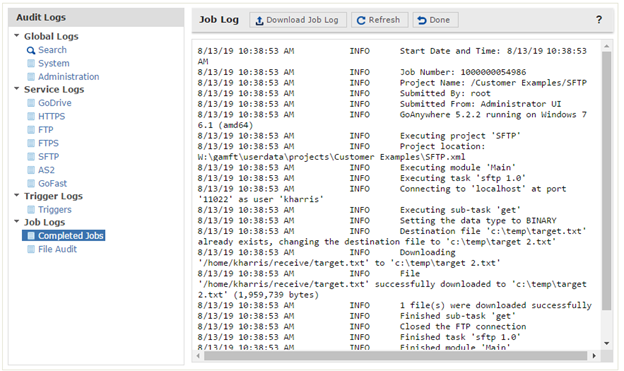
An entry is written to the Job Log every time the Project executes. To view all the Job Logs, click Logs from the main menu and then click Audit Logs. In the left-hand pane, select the Completed Jobs option. From here, you can search for the Job by the Project name, the date it ran, or the User that executed the job.
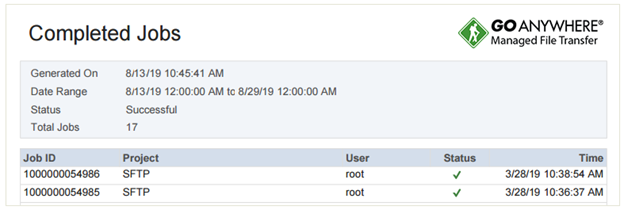
You also have the ability to create Reports of all the completed jobs. From the main menu, click Logs and then click Reports. On the Reports page, click the Completed Jobs Report. A popup window will appear that allows you to customize the report. Click the Run Report button and a PDF report will be created and downloaded to your desktop.
Improving Your Workflow
Now that the simple shell script has been converted to a managed file transfer Project in GoAnywhere MFT, you can use more tasks and commands to create an advanced and intelligent workflow. You can use variables and wild cards to download specific file types, such as TXT or CSV files. You can add data translation tasks to automatically convert CSV files to a database or XML. Or you can add more sophisticated email, SMS, or SNMP traps to alert administrators when Projects complete. While you make changes to your Project, GoAnywhere MFT automatically saves each version and allows you to restore a previous revision.